Introduction to Take Command

Contents
The integrated Take Command Environment provides a huge boost in productivity. This tutorial describes the Take Command Environment’s features and how to use them to increase your ability to work in the console environment.
Overview
Take Command is composed of four elements which work closely together:
Take Command Environment - A rich development and operations environment that allows you to:
•Manage files and review the results of file manipulation
•Create and edit command scripts
•Debug scripts
•Host, manage and control multiple console applications simultaneously in tabbed windows, including native Take Command consoles, CMD, PowerShell and bash
•Cut and paste text
•Drag and drop files into tab windows from an Explorer-like environment, other applications, or the desktop
TCC (Take Command Console) - A command processor upwardly compatible with (and a replacement for) CMD.EXE, the default command processor in Windows 8 / 2012 / 10 / 2016 / 2019. TCC is substantially enhanced with thousands of additional features, that provides the ability to:
•Interactively run commands, such as DIR, COPY, etc.
•Interactively run batch script files, such as .CMD, .BAT or .BTM scripts
•Run batch scripts as background processes based on timed schedules or operational triggers, such as changes in the system environment
Take Command Language - A mature scripting language based on and compatible with CMD.EXE, but massively enhanced. It includes:
•235+ internal commands
•290+ functions
•380+ variables
•Hundreds of additional switches for CMD compatible commands (such as COPY, DEL, DIR, and START).
•Additional underlying capabilities, such as the ability to treat FTP and HTTP directories as if they were local directories
Integrated graphical IDE with tabbed edit windows and a batch file debugger (compatible with CMD or TCC batch files), with:
•Single stepping
•Breakpoints
•Syntax coloring
•Tooltips (to display command syntax or the current variable value)
•Bookmarks
•Variable, alias, and watch windows
The Take Command Environment
Before Xerox created the concept of the graphical environment in the late 1970’s, there was the command line. Typing versus selection with a mouse. Most people like windowing systems better, but, to this day many people still do much of their work at the command line because for many tasks, it’s a lot more efficient.
In Take Command, the GUI and the command line work together to make you more efficient:
•A Windowing Environment - So you can do things like drag and drop, cut and paste, set up common tasks as icons, etc.
•A Windows Explorer Type File Manager - So you can see the file system while you are working at the command line
•Tabbed Console Manager - Providing you with the capability to easily organize and operate multiple consoles simultaneously (like Take Command, CMD, PowerShell, bash, etc.)
Why Did We Do This?
A lot of people ask us why we merged a Windows Explorer Type File Manager with a Tabbed Console Manager. Invariably their first reaction is to ask us how to get rid of the Explorer components. A week later they are using the new capabilities every day and are asking for more.
It’s pretty simple. First, some simple activities are easier to do in a graphical environment, so having the File Manager right there makes it simple to do these things without having to go look for the Windows Explorer. Second, when you are working at the command line and manipulating files, you can see the results immediately of the actions you have taken. Third, you can drag and drop file names into the console.
All in all, it turns out that these capabilities really do save you time. You will wonder why no one did this before!
The following image shows the basic Take Command environment:
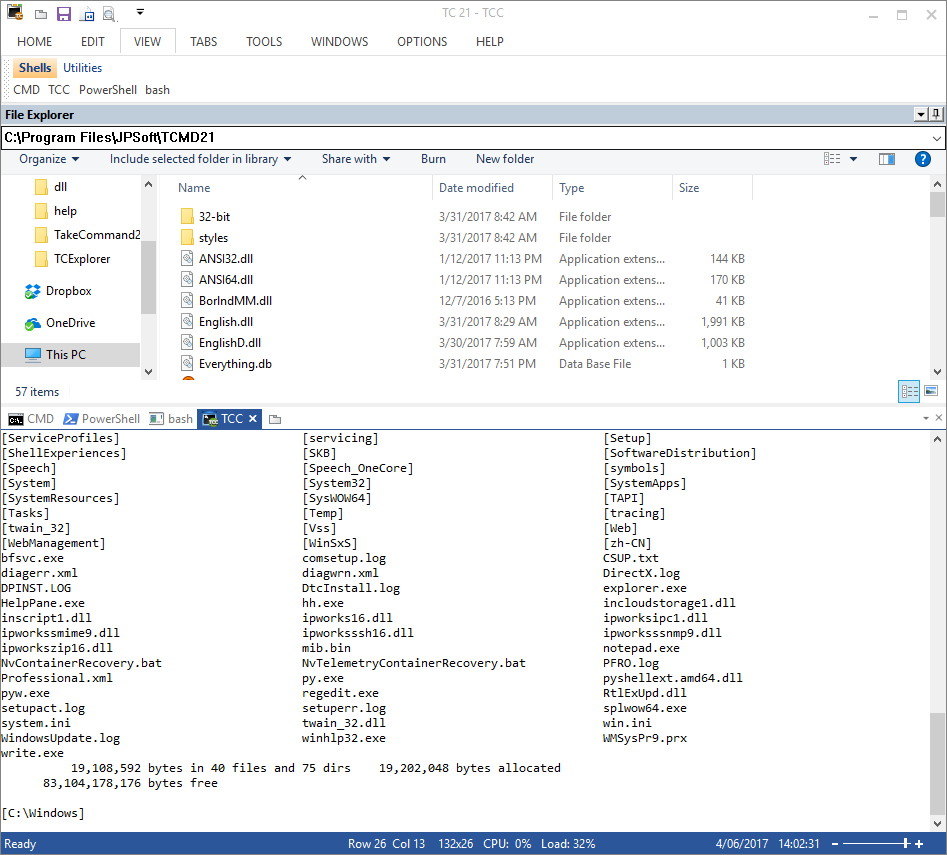
The key elements of the interface are:
1. Menu Bar -- This is an enhanced Windows Menu Bar. It allows access to the basic features of any Windows program, such as cut and paste, option, help etc. You can move it and redock it, customize it, and assign shortcut keys.
2. Folder View --The Folder View is similar to the standard Windows Explorer Folder tree view. You can see all of the primary system devices (disk drives, network devices, etc.) and expand or collapse them to see the underlying folders structure. You will not see any files in this view.
Using Autohide
In the upper right hand corner of the Folder View is a “pin”. If you select this pin, it will put the Folder View in autohide mode to increase the amount of console workspace. Putting the cursor over the resulting folder tab on the left side of the screen will bring the view back. You can return to the normal state by selecting the pin a second time. This also works for the List View.
You Can Change the List and Folder Views from a Console
You can also make the Folder and List views change to follow actions in one of the consoles. Type in the following at a console prompt and watch the results:
CDD /t c:\
The /t switch tells Take Command that it should switch the List and Folder views
3. List View -- List View shows the files (and folders) within the selected item in Folder View. As you change the selection in Folder View, this will immediately change to follow. You can also cause the folder view to follow actions in the console
4. Console View -- You can open up one or more consoles as individual tabs (a la Firefox) in this section. There are several ways to add a new console tab:
•Double click on the tab bar will open a new console window
•Right click on the console view header bar and select “new tab”. This will open up a new console tab based on the current COMSPEC variable (usually Take Command Console)
•Select “Tabs - New Tab” from the menu bar. This will also open up a new console tab based on the COMSPEC variable
•If you want to open up a new console that is different than the COMSPEC, then select “Tabs - Run”. This will open up a dialog box that will allow you to enter the name of the console program (e.g., CMD, Powershell, etc). Remember to include the full path name to the new console, unless it is already set in the environment. You can also specify the default directory for the new console tab.
•You can also set up console tabs to be automatically opened on startup. This will be discussed in the next section on options.
5. Find - Find will look for a specified text string somewhere in the active console tab. You can also search using regular expressions. The Find tool keeps a recent history of your searches that can be recalled in the drop down list.
6. Views -- Allows the List View to be configured as:
•Large icons
•List (with the name and small icon displayed)
•Detail (with names and associated data displayed)
7. Folder History -- Provides a history of the most recent directories selected in the Folder View. Previous directories can be recalled in the drop down list. You can also type a folder name directly into this field to go to that folder.
8. Filter -- You can filter what is displayed in the List View by entering a filter string here. For example, “*.pdf” will show only pdf files. “D*.pdf” will show only pdf files beginning in “D”. You can also filter based on regular expressions. As with other selection boxes, you have access to recent history.
9. Edit/Debug -- Pressing this button will open a edit/debug session. In this new window, you can edit and debug batch programs written in CMD’s language and the vastly extended TCClanguage. This is discussed in more detail in a later tutorial. It’s also useful to note that the editor and debugging functions will work with CMD.EXE batch files, offering a much improved development environment.
10. Tab Toolbar -- The Tab Toolbar allows each user to configure up to 20 toolbar tabs (with up to 50 buttons each) to execute common activities. These buttons can execute:
•Internal commands
•External commands/programs
•Batch programs
•Aliases
•Change the current Folder/List views
•Feed keystrokes to the active tab window
To set up a new button, right click on an empty part of the Tab Toolbar, and select “Add button”. (You can modify an existing button by right clicking on the button.) This will pop up the following dialog:

•Startup Action -- A toolbar button will execute one of three basic actions. It can either:
oOpen a new tab running whatever program you specify in the Command field)
oSend keystrokes to the current tab (e.g., commands, aliases, etc.)
oChange the folders directory- like CDD /T, but it does it without having to invoke a TCC tab window. (Useful for creating buttons to change Folders / List View to commonly used directories.)
A Note on Keystroke Interpretation
If the tab is sending keystrokes to the current tab, the text is in the same format as the KEYSTACK command in TCC.
Text entered within double quotes, e.g., "abc" will be sent to the active console application as is. The only items allowed outside the quotes are key names, /W options, and a repeat count.
If keyname is a number, it is interpreted as an ASCII character value.
Repetition. To send keyname several times, follow it with a space, left bracket [, the repetition count, and a right bracket ]. For example, the command below will send the Enter key 4 times:
enter [4]
The repeat count works only with an individual keyname. It cannot be used with quoted strings. You must have a blank space between the keyname and the repetition count.
•Separator -- You can also specify that there will be a separator (additional space) between this toolbar button and the previous button in the list - generally for cosmetic reasons. You can define a toolbar button to display an icon, a text label, or both. You must specify either the Icon or Label fields. If you enter both, Take Command will display the text to the right of the icon on the button.
•Icon field -- Enter the filename for the icon (.ico) that you want to display on the button. If you specify an .exe filename, Take Command will use the first icon in that file. You can use the Browse button to find the file.
•Label field -- enter the text that you want to display on the button.
•Command field -- you can enter either the command to be started in a new window ("Start a new window"), or the keystrokes to be sent to the current tab ("Send to current tab"). You can also use the Browse button to find a file to be entered at the beginning of the Command field.
•Directory field -- If you're starting a new window, the Directory field will set the startup directory for the command. You can use the Browse button to find the directory.
If you exit by choosing the OK button, any changes you have made will be saved in TCMD.INI, and reloaded automatically the next time you start Take Command. If you use the Cancel button, your changes will be discarded.