Find Files

Contents
The Find Files/Text dialog box, available from the Edit menu, gives you the same features as the FFIND command, in dialog form.
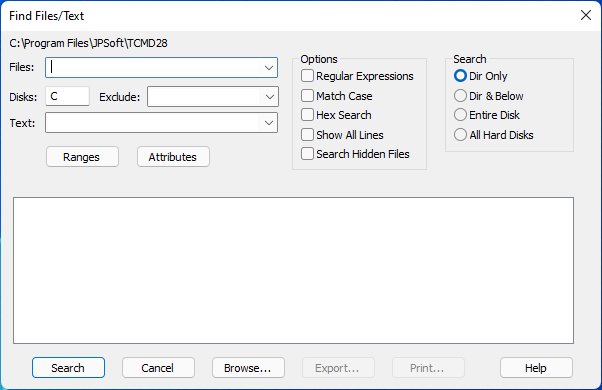
Enter the file name or names you wish search in the Files field. You can use wildcards and include lists as part of the file name. To select files from previous searches in the same Take Command session, click on the down arrow beside the Files field, or press the up or down arrow while the input cursor is in the Files field. You can also use the Browse button to find files to include in the search.
Enter the drive(s) you want to search in the Disks field. This field is ignored unless Entire Disk is selected in the Search portion of the dialog. If you select All Hard Disks, this field is set automatically to include all hard disk drive letters Take Command finds on your system.
If you use wildcards to specify the files to search, you can narrow the search with the Exclude field by specifying files that you want to exclude from the search. Like the Files field, the Exclude field can contain wildcards and include lists. For example, if you want to search all files with an extension beginning with I except for .ICO and .INI files, you could enter *.i* in the Files field and then *.ico;*.ini in the Exclude field.
Enter the text (or hexadecimal values) you are searching for in the Text field. You can use extended wildcards in the search string to increase the flexibility of the search. Use back-quotes ` around the text if you want to search for characters which would otherwise be interpreted as wildcards. For example, to search for an A, followed by some number of other characters, followed by a B, enter the A*B as your search string. To search for the literal string A*B (A, followed by an asterisk, followed by B), enter `A*B` as your search string (the closing back-quote is optional).
You can search either using the TCC-style extended wildcards or with regular expressions.
The Match Case box, when it is selected, makes the search case-sensitive. This option is ignored if Hex Search is selected. The Hex Search option signals that you are searching for hexadecimal values, not ASCII characters. See the FFIND command for more details.
If you enable All Lines, every matching line from every file will be displayed; otherwise only the first matching line from each file will be displayed. Unless you enable the Hidden Files option, files with the hidden and system attributes will not be included in the search.
The radio buttons in the Search area let you specify where you want Take Command to look for files. If you select Dir Only or Dir & Below, the search will begin in the current default directory, shown above the Files box. If you select Entire Disk, Take Command will use the drives that you specified in the Disks field. If you select All Hard Disks, Take Command will search all the hard disk drives it finds on your system.
To start the search, press the Search button. Once the search has started the Search button changes to a Stop button, which you can use to interrupt the search before it is finished.
If the search yields a list of matching files, you can save that list with the Export button or send it to the default printer with the Print button.
If you select one of the matching files in the list (by double-clicking on it, or selecting it with the cursor and pressing Enter), Take Command will display another dialog with complete directory information about the file. From that dialog you can Run the file (if it is an executable file, a batch file, or has an executable extension), or Edit the file (with its associated app, or Notepad if there is no association). When you exit from the editor, the original list of matching files will still be available.